Module Documentation
This document guides you through the module development process within the FirstSpirit Cloud. You will find the general process explained briefly. Links will lead you to the detailed documentation to address specific steps of the journey.
Target audience: (new) module developers in the FirstSpirit Cloud setting
Preconditions: DTA (Developer Training Advanced)
Training & Coaching Center
Your FirstSpirit Cloud environment
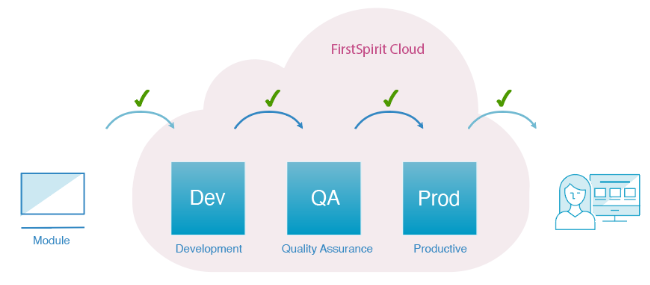
By default, your FirstSpirit Cloud instance includes three environments: Dev, QA and Prod:

Development (Dev)
This environment is where one or more developers can work without posing any risk to each other or the production code.
Quality Assurance (QA)
This environment is the staging or testing area where you can test developed segments to ensure quality before they’re transferred to the Production Environment. Therefore this is a nearly exact replica of the production environment.
Production (Prod)
This environment contains all deployed/published projects that may already hold content and are available for your customers.
- All three stages contain nearly the same projects.
- Template and setting changes are regularly moved to the next stage to avoid divergent development states.
- While Dev and QA typically contain test content, Prod contains all of the live project content.
Supporting tools for module development
| Development tool | Used in Crownpeak Cloud development |
|---|---|
|
Programming Language |
|
|
Version Control |
|
|
Branching Model |
|
|
Source Code Repository |
|
|
CI/CD |
|
|
Build Automation Tool |
|
|
Artifact Repository |
Extending FirstSpirit
FirstSpirit provides multiple extensibility opportunities that allow developers to implement customized server-side as well as client-side functionality. The FirstSpirit API's various extension points can be used by different so-called component types.
Components are packaged in and distributed as FirstSpirit modules which are in essence ZIP files with an .fsm extension containing all resources and dependencies as well as a module descriptor in XML format. Module Definition
Note: All cloud servers use the isolated mode. Some central aspects are described here: Module development "Isolated"
Extending the FirstSpirit ContentCreator
As part of the ContentCreator's user-centered design, Crownpeak provides project developers with means to design custom functionality that presents additional interaction features that will help editors perform specific tasks. ContentCreator Extensions
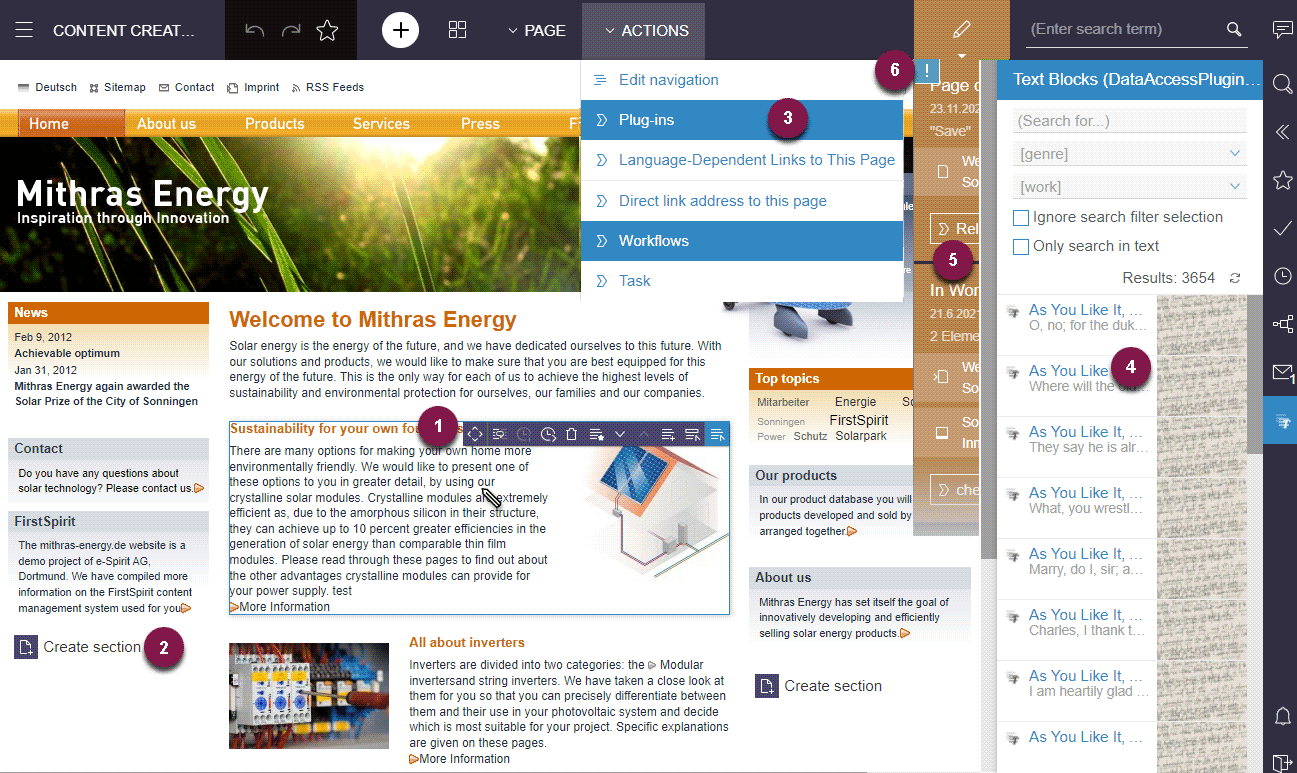
All of these plug-in types are connected to different areas in the ContentCreator user interface and is able to handle FirstSpirit data as well as poll input from users:

| Use cases for ContentCreator modules | Support |
|---|---|
|
1. InlineEdit Items |
|
|
2. Template Buttons (FS_BUTTON) |
|
|
3. Toolbar Menu Items |
|
|
4. Reports (Data Access) |
|
|
5. Element Status and Workflow Grouping |
|
|
6. Page-Based Notifications |
Extensions in FirstSpirit SiteArchitect
The FirstSpirit SiteArchitect provides multiple means to integrate plug-in components. Such components can include automation features, additional input components or connectors to web services serving as data providers or further content editing tools. SiteArchitect Extensions
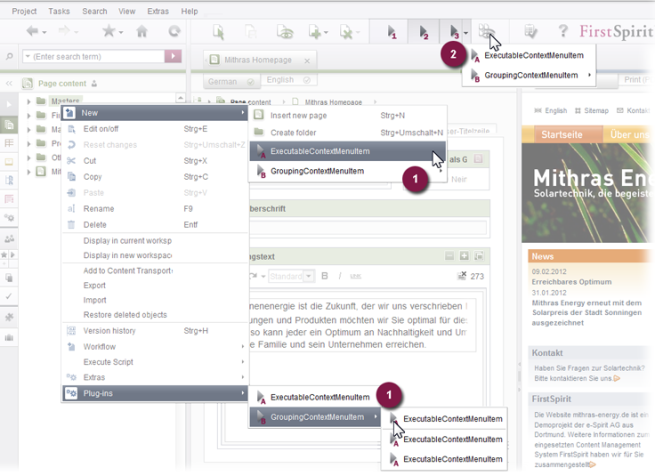
Each of these plug-in types is connected to a different area in the SiteArchitect UI and uses FirstSpirit API functionality to execute programm actions:

| Use cases for SiteArchitect modules | Support |
|---|---|
|
1. Context Menu Items |
|
|
2. Toolbar Items |
|
|
3. Reports (Data Access) |
Setting up your work environment
As a developer, you need to set up your environment:
- Access to Git repositories
- Artifactory credentials
The setup only needs to be done once; the configuration is shared across all repositories.
Setting up access to Git repositories
To get access to the Git repository, you must provide your SSH key in your Bitbucket profile. Use an existing key or create one. Add the public key to your profile.
Setting up artifactory credentials to access module dependencies
Dependencies specified in your module are downloaded from our artifactory, which acts as a Maven repository. To make this work, you need to specify the log-in information in your personal gradle.properties.
The gradle.properties file is located in $HOME/.gradle/gradle.properties.
The file should contain at least:
artifactory_hosting_username=cloud_username artifactory_hosting_password=cloud_encrypted_password
cloud_username is usually your full email address.
The encrypted password can be retrieved with a simple REST call-up of the artifactory. For logging in use your cloud log-in credentials.
Developing modules
The first step to developing your module is to clone the existing repository from your FirstSpirit Cloud Git. If the repository does not yet exist, send a request to the Crownpeak Support team.
The following steps can help you in developing your own FirstSpirit modules:
| Developing modules | Support |
|---|---|
|
1. Send a request to the TechnicalSupport team |
Create ticket at TechnicalSupport |
|
2. Clone the existing repository in Bitbucket |
|
|
3. Packaging a module into an FSM file |
|
|
Use a local test server |
|
|
Usage of Web application components |
Create ticket at TechnicalSupport
|
Distributing modules
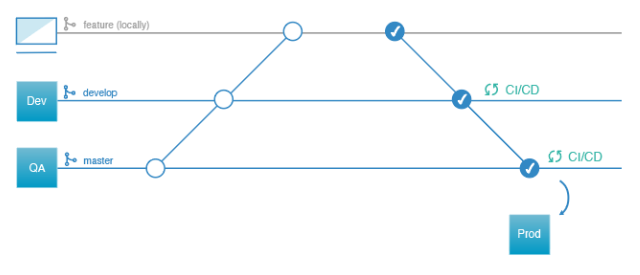
Depending on the Git branch that you are using, a pushed commit will trigger an automatic build process. This will install the module in one of your cloud instances. The naming convention is identical to the one in the Git Flow, a Git workflow which we recommend using.

The following steps can help you in developing your own FirstSpirit modules:
| Distributing modules | Support |
|---|---|
|
1. Develop features locally |
New features should always be developed and tested locally on a feature branch. Pushed commits on these branches will be compiled and tested by our CI pipeline, but your cloud servers will be left unchanged. |
|
2. Push finished features to Dev branch |
Pushed commits on the Dev branch are installed on the Dev Cloud instance. This requires a successful compilation and test execution without any errors. If your module contains WebApp components and your component is deployed for the first time, contact Technical Support to have the component added to the respective global web application (ContentCreator / Preview). In the ticket, provide the
|
|
3. Merge changes to master branch (QA) |
To release a new version of your module, it needs to be installed in your QA instance. The installation is performed automatically after the changes are merged into the master branch. |
We recommend using Semantic Versioning.
|
4. Install module in Prod instance |
New module versions in the production instance are installed during patch days only. Contact the FirstSpirit Technical Support team for details. In the ticket, provide the
|