Installation guide – Multisite Management
Requirements
To use FirstSpirit™ Multisite Management, the following services must be installed and preconfigured:
- FirstSpirit™ Multisite Management module in the current version
- FirstSpirit™ (version 2023.12 or higher)
- Tomcat 10.1.11 or higher
- Fully configured CXT platform (including Tomcat properties files)
- PostgreSQL (version 12.0 or higher)
- A FirstSpirit™ module that provides the JDBC drivers for the used database
Configuration
The configurations must be made before installing the module for the first time. The order of the configurations does not matter.
FirstSpirit™
A directory with the name "fs-multisite.fs-multisite-service" must be created in the "[FirstSpirit]/conf/modules/" directory.
Within the newly created directory "fs-multisite.fs-multisite-service", a new file named "fs-multisite-service.properties" must be created containing the following content:
fs.microapp.multisite.database.driver.module=<Modulename>
fs.microapp.multisite.database.driver=org.postgresql.Driver
fs.microapp.multisite.database.url=<JDBC URL>
fs.microapp.multisite.database.user=<Username>
fs.microapp.multisite.database.password=<Password>
Sample content for the "fs-multisite-service.properties" file:
fs.microapp.multisite.database.driver.module=JDBC_PostgreSQL_42_33
fs.microapp.multisite.database.driver=org.postgresql.Driver
fs.microapp.multisite.database.url=jdbc:postgresql://localhost:5432/fsmultisitemicroapp
fs.microapp.multisite.database.user=myDatabaseUser
fs.microapp.multisite.database.password=myUserPassword
Tomcat
- The "postgre-[version of the database].jar" file matching the version database must be copied into the "[Tomcat]/lib/" directory.
- In the "[Tomcat]/lib/config/" directory, a new file with the name "fs-multisite-microapp.properties" with the following contents must be created:
fs.microapp.multisite.database.driver=org.postgresql.Driver
fs.microapp.multisite.database.url=<JDBC URL>
fs.microapp.multisite.database.user=<Username>
fs.microapp.multisite.database.password=<Password>
Sample content for the file "fs-multisite-microapp.properties":
fs.microapp.multisite.database.driver=org.postgresql.Driver
fs.microapp.multisite.database.url=jdbc:postgresql://localhost:5432/fsmultisitemicroapp
fs.microapp.multisite.database.user=myDatabaseUser
fs.microapp.multisite.database.password=myUserPasswordDatabase
The schema matching the "fs.microapp.multisite.database.schema" parameter (if configured, it is set to public by default) must be created in the database. The user specified in the "fs.microapp.multisite.database.user" parameter must be granted full reading & writing permissions on the schema.
Installation
The installation of the FirstSpirit™ Multisite Management (fs-multisite-[version].fsm) module on the FirstSpirit server is carried out as usually via the ServerManager.
To make the initial setup of the module as easy as possible, a number of things are automated during the installation. These include:
- Creating and deploying the global "FirstSpirit Multisite Management" web app.
- ID: fs-multisite-microapp
- Name: FirstSpirit MultisiteManagement | MicroApp
- Web context: /fs-multisite-microapp
- The new web app is initially deployed on the same web server as the root web app.
- Adding the "FirstSpirit Multisite Management" web component to the ContentCreator web app.
- The ContentCreator web app is not deployed automatically.
- Adding the internal "FirstSpirit Multisite Management" service to the list of automatically started services.
- If the configuration has been made correctly, the internal "FirstSpirit Multisite Management" service starts automatically and makes all the necessary changes in the configured database.
Project configuration
Managing bundles
To use FirstSpirit™ Multisite Management as a source project, the "FirstSpirit MultisiteManagement | Bundle management" project component must be added to the respective source project.
After the project component is added to a project, the FirstSpirit™ Multisite Management application will be available for the project admins in the ContentCreator toolbar.
Defining target projects
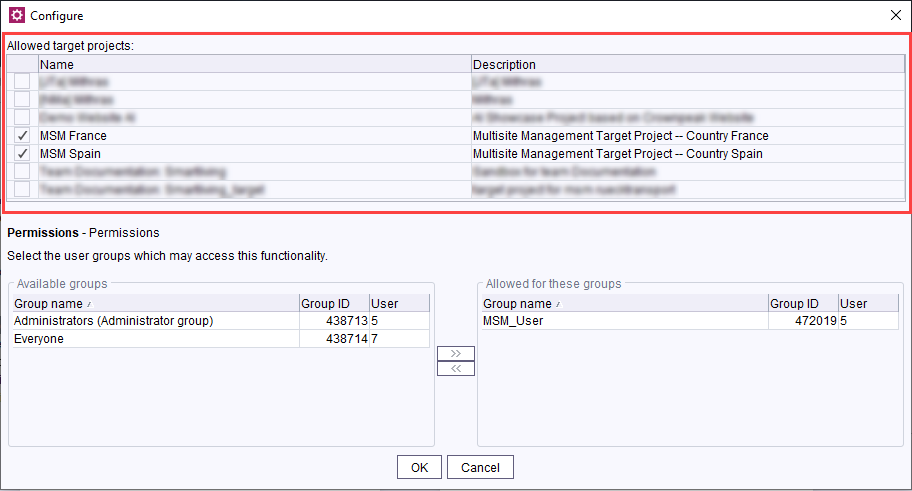
Available target projects for all bundles of a project can be configured in the project component FirstSpirit MultisiteManagement | Bundle Management.
To configure the available target projects for a source project, navigate to the ServerManager. Select the source project and open the configuration of the project component. Select the desired projects from the list of projects. If no project is explicitly selected, no target projects are defined for the source project by default.

Managing MSM users
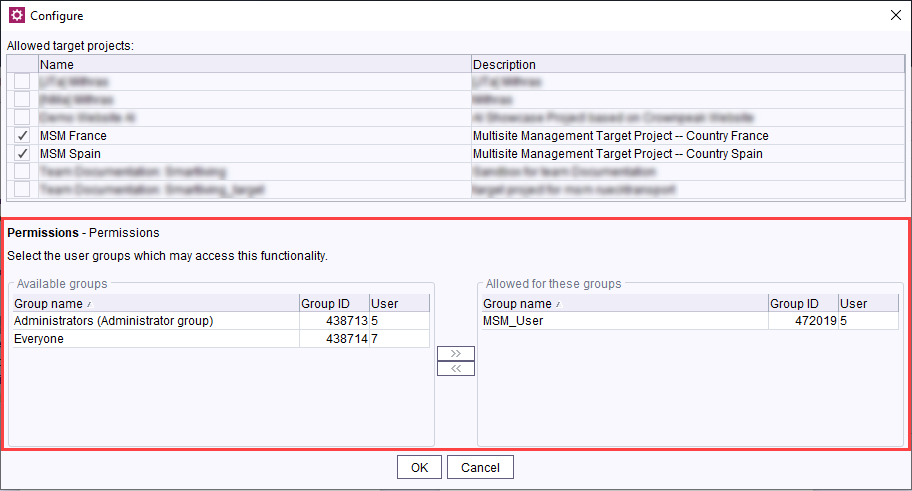
In the project component FirstSpirit Multisite Management | Bundle Management, you can also specify which user groups are allowed to use the functionality.
As a server admin or project admin of a target project, you can access the MSM functionality by default.
For all other users, you should create a group and add this group to the allowed groups in the project component.

Layer mapping
To configure a layer mapping during the bundle installation process in a target project, you have to add the project component FirstSpirit MultisiteManagement | Layer mapping to the corresponding target project.
To initially transfer a schema from the source project to a specific layer in the target project, you must define this in the project component of the target project. The required mapping should be specified on a per-line basis, following the format "<source layer>=<target layer>". Additionally, the wildcard * is supported to represent all undefined source layers.
Example
In the source project, "Project_A", exists a schema, "TestSchema", that was created on "Layer_A." In the target project, two layers are configured, "Layer_B" and "Layer_C." It should be ensured that "TestSchema" from "Layer_A" in "Project_A" is transported to "Layer_C" in "Project_B."
- Add the project component FirstSpirit Multisite Management | Layer Mapping to the target project "Project_B".
- Enter the following in the project component in the target project:
Layer_A=Layer_C→ It is ensured that the layer in the target project points to "Layer_C".
→ "TestSchema" is initially transported from "Layer_A" in "Project_A" to "Layer_C" in "Project_B".